| Line 305: | Line 305: | ||
|imagewidth = 50px |
|imagewidth = 50px |
||
|caption = (TBA) |
|caption = (TBA) |
||
| − | }}Akin to prior installments, the Spike Factory shoots out clumps of five tacks at a rate of one shot in approximately 2.3 seconds (per second if fast-forwarded). Compared to other towers that transitioned from Bloons |
+ | }}Akin to prior installments, the Spike Factory shoots out clumps of five tacks at a rate of one shot in approximately 2.3 seconds (per second if fast-forwarded). Compared to other towers that transitioned from [[Bloons Tower Defense 5]] to [[Bloons Tower Defense 6]], the Spike Factory is one of few that has both its original upgrade lines intact, with the first path consisting of stronger piles that lead to destructive mines and the second focusing on faster production that leads to [[MOAB-SHREDR Spikes]] as well as both having their respective Tier 5 Upgrades. The third new path is a more tactile one, providing increased area of coverage to a targeting priority to spikes that last longer before timing out and even pass over to the next round. |
<br style="clear:both" /> |
<br style="clear:both" /> |
||
===Path 1=== |
===Path 1=== |
||
Revision as of 13:30, 6 August 2018
| “ | Generates piles of road spikes around the track automatically. Leftover spikes disappear at the end of each round. | ” |
| ~ Bloons Tower Defense 4 Description |
| “ | Generates piles of road spikes on bits of nearby track. Each pile can pop 5 bloons, and unused spikes disappear at end of each round. | ” |
| ~ Bloons Tower Defense 5 Description |
| “ | Automatically generates piles of Road Spikes on the nearby track. Excellent last line of defense. | ” |
| ~ Bloons Tower Defense 6 Description |
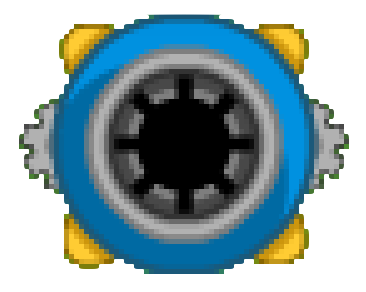
The Spike Factory is a tower that produces Road Spikes on the track that pop bloons and disappear at the end of each round that made its debut in Bloons Tower Defense 4. Its special ability, Spike Storm, is capable of popping large amounts of bloons, destroying even MOABs and BFBs easily. Like the Dartling Gun, the Spike Factory was not included in the original edition of BTD4. The tower was released on September 8th, 2011. It costs $595 on Easy, $700 on Medium, and $755 on Hard. On March 15, 2012, it was added to Bloons TD 5 as an update. The Spike Factory is capable of popping camo bloons without any upgrades. In BTD5, it initially costs $640 (Easy), $750 (Medium) or $810 (Hard).
Bloons Tower Defense 4
Before being upgraded, the Spike Factory shoots out clumps of five tacks at a rate of one shot nearly every three seconds (per second if fast-forwarded). These clumps always land in corners and disappear at the end of each round. If the spike factory is not placed in range of a corner, then the spike factory will act as if it is not in range of the track at all, and shoot spikes randomly in all directions. This tower will shoot randomly in its range and will not aim for bloons.
Faster Production
Description:
Makes the factory produce spikes much faster.
This costs $595 on Easy, $700 on Medium and $755 on Hard, making it cost itself.
Bigger Stacks
Description:
The factory creates double size spike stacks.
This costs 510 on easy, 600 on medium and 650 on hard.
White Hot Spikes
Description:
White hot spikes can pop frozen and lead bloons.
This costs 295 on easy, 350 on medium and 380 on hard. The tower turns purple.
Spike Storm
Description:
Every 15 seconds the factory generates a storm of short-lived spikes, filling up the entire track. The tower turns red.
This costs 5950 on easy, 7000 on medium and 7560 on hard.

Bloons Tower Defense 5
These are all the upgrades for the Spike Factory. Path 1 refers to the left upgrade path while Path 2 refers to the right upgrade path within the game.
Before being upgraded, the Spike Factory shoots out clumps of five tacks at a rate of one shot in approximately 2.3 seconds (per second if fast-forwarded) or 69 frames. These clumps last until they are used up or the spikes time out (they will do this after a 70 seconds or when a round ends). This tower is always able to detect Camo Bloons. However, it will never lay down spikes in between rounds. In addition, all spikes created will disappear once the current round ends, and if a single Spike Factory creates too many piles, the ones on the bottom will start to disappear in the order they were created, meaning that there is a maximum number of spikes that a single tower may have created at any time (unlike in BTD4, where they lasted indefinitely and may have caused lag when too many are on screen).
With the correct upgrades, the Spike Factory can be quite a versatile tower, as it can be upgraded to combat Lead Bloons, frozen Bloons, and deal extra damage to Ceramic Bloons/MOAB-class bloons, whilst not being overly dependent on a Monkey Village's benefits in order to combat these Bloon types.
Path 1
|
Image |
Upgrade |
Easy | Medium | Hard | Impoppable |
|---|---|---|---|---|---|

|
Bigger Stacks Generates larger piles of spikes per shot (10 spikes per shot). |
$595 | $700 | $755 | $840 |

|
White Hot Spikes Cuts through lead like a hot spike through... lead. |
$765 | $900 | $970 | $1080 |

|
Spiked Ball Factory Modified to produce heavy but viciously sharp spiked balls instead of regular spikes. Do extra damage (3x) to ceramic bloons. (Their popping power also increases to 16 (20 in the iOS version).) |
$2040 | $2400 | $2590 | $2880 |

|
Spiked Mines Rigged with heavy explosives, the spiked balls are set to go off when then they lose all their spikes. (Explosions pop 4 layers of many bloons. Attack rate (4/0) improves to once every 31 frames, or 1.03 seconds. The explosions have the same effect as the Mortar Tower's Burny Stuff.) |
$11900 | $14000 | $15120 | $16800 |
| Total Sell Amount | $12240 | $14400 | $15548 | $17280
($19248 with path 2 upgrades) | |
| Total Cost | $15300 | $18000 | $19435 | $21600
($24060 with path 2 upgrades) |
Path 2
|
Image |
Upgrade |
Easy | Medium | Hard | Impoppable |
|---|---|---|---|---|---|

|
Faster Production Attack rate improves to once every 43 frames. Approximately every 1.43 seconds |
$680 | $800 | $865 | $960 |
|
Even Faster Production Attack rate improves to once every 26 frames. Approximately every 0.86 seconds. |
$1065 | $1250 | $1350 | $1500 |

|
MOAB-SHREDR Spikes Each spike does 4x damage to MOAB-class bloons, Attack rate improves to once every 16 frames. Approximately every 0.53 seconds. |
$2550 | $3000 | $3240 | $3600 |

|
Spike Storm Lays a thick carpet of spikes over the whole track. Spikes last 5 seconds unless reacted upon, in which the spikes will get an extra 5 seconds to pop a bloon. |
$5525 | $6500 | $7020 | $7800 |
| Total Sell Amount | $7856 | $9240 | $9980 | $11088
($12624 with path 1 upgrades) | |
| Total Cost | $9820 | $11550 | $12475 | $13860
($15780 with path 1 upgrades) |
Tower XP
| Level | Upgrade at next level | Total XP | XP to next level |
|---|---|---|---|
| 1 | Bigger Stacks | 0 | 500 |
| 2 | Faster Production | 500 | 500 |
| 3 | White Hot Spikes | 1,000 | 500 |
| 4 | Even Faster Production | 1,500 | 2,000 |
| 5 | Spiked Ball Factory | 3,500 | 6,500 |
| 6 | MOAB-SHREDR Spikes | 10,000 | 7,000 |
| 7 | Spiked Mines | 17,000 | 23,000 |
| 8 | Spike Storm | 40,000 | 63,000 |
Differences between BTD5 Flash and BTD5 Mobile
![]() Spike Factory and its upgrades have a slower attack speed.
Spike Factory and its upgrades have a slower attack speed.
![]() Spiked Balls pop more bloons (16 → 20).
Spiked Balls pop more bloons (16 → 20).
![]() Spiked Mines have smaller explosions and pops less bloons (20 → 16).
Spiked Mines have smaller explosions and pops less bloons (20 → 16).
![]() Spike Factory produces one pile of spikes immediately upon placement, instead of delaying for a few seconds.
Spike Factory produces one pile of spikes immediately upon placement, instead of delaying for a few seconds.
Update History (Bloons TD Battles Mobile)
The Spike Factory's been noticeably buffed via game updates in the form of price reductions to its upgrades and itself. Despite this however, it continues to be one of the least used towers in the game along with the Glue Gunner and the Sniper Monkey, due to how heavily it struggles versus grouped bloons. The only loadouts that use the Spike Factory are Engineer Farm Spike Factory, Boomerang Farm Spike Factory, and Tack Farm Spike Factory.
Due to prevention of lagging other players' devices, Ninja Kiwi has nerfed the Spike Factory to produce much less spikes than normal by decreasing its spike pile lifespan dramatically.
- Initial Release
![]() Spikes have a much shorter lifespan (70 seconds → 20).
Spikes have a much shorter lifespan (70 seconds → 20).
- 3.1
![]() White Hot Spikes price decreased ($900 → $600).
White Hot Spikes price decreased ($900 → $600).
![]() Spiked Ball Factory price decreased ($2400 → $2200).
Spiked Ball Factory price decreased ($2400 → $2200).
![]() Spiked Mines price decreased ($14000 → $12000).
Spiked Mines price decreased ($14000 → $12000).
- 3.4
![]() Spike piles no longer spawn onto unused track in Defend Mode.
Spike piles no longer spawn onto unused track in Defend Mode.
- 3.7
![]() Tower price decreased ($750 → $700).
Tower price decreased ($750 → $700).
![]() Faster Production price decreased ($800 → $700).
Faster Production price decreased ($800 → $700).
![]() Even Faster Production price decreased ($1250 → $1150).
Even Faster Production price decreased ($1250 → $1150).
- 4.6
![]() Tower price decreased ($700 → $600).
Tower price decreased ($700 → $600).
![]() Bigger Stacks price decreased ($700 → $550).
Bigger Stacks price decreased ($700 → $550).
![]() White Hot Spikes price decreased ($600 → $500).
White Hot Spikes price decreased ($600 → $500).
![]() Faster Production price decreased ($700 → $600).
Faster Production price decreased ($700 → $600).
![]() Even Faster Production price decreased ($1150 → $900).
Even Faster Production price decreased ($1150 → $900).
Bloons Tower Defense 6
Akin to prior installments, the Spike Factory shoots out clumps of five tacks at a rate of one shot in approximately 2.3 seconds (per second if fast-forwarded). Compared to other towers that transitioned from Bloons Tower Defense 5 to Bloons Tower Defense 6, the Spike Factory is one of few that has both its original upgrade lines intact, with the first path consisting of stronger piles that lead to destructive mines and the second focusing on faster production that leads to MOAB-SHREDR Spikes as well as both having their respective Tier 5 Upgrades. The third new path is a more tactile one, providing increased area of coverage to a targeting priority to spikes that last longer before timing out and even pass over to the next round.
Path 1
| Easy | Medium | Hard | Impoppable | Unlock XP | |
|---|---|---|---|---|---|
|
Bigger Stacks |
$510 | $600 | $650 | $720 | 170 |
|
White Hot Spikes |
$680 | $800 | $865 | $960 | 600 |
|
Spiked Balls |
$2,040 | $2,400 | $2,590 | $2,880 | 2,400 |
|
Spiked Mines |
$11,900 | $14,000 | $15,120 | $16,800 | 15,000 |
|
Super Mines |
$148,750 | $175,000 | $189,000 | $210,000 | 32,500 |
| Total Sell Amount |
Tier 4: $11,067 Tier 5: $115,192 |
Tier 4: $13,020 Tier 5: $135,520 |
Tier 4: $14,063 Tier 5: $146,363 |
Tier 4: $15,624 Tier 5: $162,624 |
N/A |
| Total Cost |
Tier 4: $15,810 Tier 5: $164,560 |
Tier 4: $18,600 Tier 5: $193,600 |
Tier 4: $20,090 Tier 5: $209,090 |
Tier 4: $22,320 Tier 5: $232,320 |
50,670 |
Path 2
| Easy | Medium | Hard | Impoppable | Unlock XP | |
|---|---|---|---|---|---|
|
Faster Production |
$595 | $700 | $755 | $840 | 180 |
|
Even Faster Production |
$765 | $900 | $970 | $1,080 | 650 |
|
MOAB SHREDR |
$2,550 | $3,000 | $3,240 | $3,600 | 2,500 |
|
Spike Storm |
$5,525 | $6.500 | $7,020 | $7,800 | 11,000 |
|
Carpet Of Spikes |
$42,500 | $50.000 | $54,000 | $60,000 | 35,000 |
| Total Sell Amount |
Tier 4: $9114 Tier 5: $36,831 |
Tier 4: $8,330 Tier 5: $43,330 |
Tier 4: $8,995 Tier 5: $46,795 |
Tier 4: $9,996 Tier 5: $51,996 |
N/A |
| Total Cost |
Tier 4: $13,020 Tier 5: $52,615 |
Tier 4: $11,900 Tier 5: $61,900 |
Tier 4: $12,850 Tier 5: $66,850 |
Tier 4: $14,280 Tier 5: $74,280 |
49,330 |
Path 3
| Easy | Medium | Hard | Impoppable | Unlock XP | |
|---|---|---|---|---|---|
|
Long Reach |
$125 | $150 | $160 | $180 | 120 |
|
Directed Spikes |
$340 | $400 | $430 | $480 | 550 |
|
Long Life Spikes |
$1,190 | $1,400 | $1,510 | $1,680 | 2,100 |
|
Deadly Spikes |
$2,975 | $3,500 | $3,780 | $4,200 | 9,000 |
|
Perma-Spike |
$21,250 | $25,000 | $27,000 | $30,000 | 29,500 |
| Total Sell Amount |
Tier 4: $3,717 Tier 5: $18,592 |
Tier 4: $4,375 Tier 5: $21,875 |
Tier 4: $4,722 Tier 5: $23,622 |
Tier 4: $5,250 Tier 5: $26,25 |
N/A |
| Total Cost |
Tier 4: $5,310 Tier 5: $26,560 |
Tier 4: $6,250 Tier 5: $31,250 |
Tier 4: $6,745 Tier 5: $33,745 |
Tier 4: $7,500 Tier 5: $37,500 |
41,270 |
Tower Tips
- The Tower works by launching a road spike pile to a random section of track located within its attack radius every three seconds (assuming its not upgraded and fast forward is not on), regardless of any bloons in its attack radius. Since it produces the same amount of spikes in a given timeframe regardless of how much track it has to choose from, it's often best to position this tower so as to concentrate its spikes in a specific key section of track, such as the exit.
- This tower can be very useful in game modes in which you only have 1 life, such as Impoppable, as it can prevent a game over due to any bloons leaking.
Trivia
The Spike Factory is out!
- The first path changes the type of spikes that the Factory produces, while the second path increases the speed of producing spikes.
- If the Spike Factory is placed far enough from the track, the Road Spikes it produces will not be seen.
- It is possible to beat the entire game with only this tower because it can pop Camo Bloons, and with White Hot Spikes, Lead Bloons.
- This can be made even easier on the mobile version with the maxed specialty building.
- This tower has the same colors as the Dartling Gun in BTD4. Both start out green/yellow at levels 1-3, blue/purple at level 4 and red at level 5.
- To see the max amount a 4-2 Spike Factory can pop, see
this document(file deleted). - In Bloons TD Battles, after the release of Bloontonium Mine the Spike Factory was nerfed to fire half as fast compared to BTD5 and BMC with the spikes popping twice as many bloons as before.
- In BTD4, sometimes the Spike Storm will only cover 1/4-1/2 of the track, while in BTD5, it covers the whole track, the spikes disappear faster than in BTD4.
- However, there originally was a bug where Spike Storm ability only placed spikes in the Spike Factory's range.
- The spikes created by the Spike Factory will not be placed on the track if the Spike Factory placed far enough from the track. However, in BTD5 the spikes still have an effect if bloons hit it when being blown back by upgrades such as Distraction.
- In BTD5, there is a glitch where when you buy Even Faster Production, it doesn't load the upgraded look unless it is under the range of a monkey village.
- There is no hotkey for the Spike Factory in BTD4. In BTD5, its hotkey is M.
- If the Spiked Mines time out, there will be a bloon-popping explosion. This is especially evident in long rounds.
- In BTD5, the player only needs 2 of these to beat Monkey Lane on easy (even without selling them or using Road Spikes), and having both of them be 4/1 or 4/2 or with Tack Awesomizer is optional.
- In BTD4, there appears to be 6 spikes with no upgrades, but they will pop only 5 bloons.
- In BTD5, the Bigger Stacks upgrade is not like regular Road Spikes as it will pop only 10 (20 with Tack Awesomizer) Bloons instead of 11 (22 with Tack Awesomizer).
- However in BTD5 Mobile, it pops as many bloons as the regular Road Spikes.
- On certain maps where the exit is parallel to the start, spikes that are placed at the exit will only pop MOAB class bloons because of their size. This is a great way to pop the MOAB layer, especially in Bloons Monkey City where many maps are like this.


What remains of a BFB when spikes are placed close to the entrance, but not close enough to pop the regular bloons
- A 2-2 Spike Factory used to look the same as an 1/1 one if upgraded to 1/1, then both tier 2 upgrades were bought. This could be solved by placing a village near the Spike Factory. This bug was patched.
- In BTD4 iOS, there is a glitch that the Spike Factory can produce bigger stacks even without any upgrades.
- In BTD5 iOS a Spike Factory will occasionally produce a big stack when the Popping Power upgrade is active.
- The Spike Factory is the only tower other than the Boomerang Thrower that has different price in BMC than in BTD5.
- In BTD4, Spike Factories may not place spikes in the track if placed too close to the Bloons' path.
- In Bloons TD Battles, Spiked Mines were a great way to freeze the opponent's computer, when spammed, due to the extreme amount of explosions.
- The Spike Factory and the Monkey Engineer both use sprockets in their upgrade descriptions.
- Upgrading a Spike Factory in both paths gives it a unique appearance, somewhat blending the colors of both upgrades.
- In Bloons Monkey City, the claim of the strength that it "never misses" is false because if a Pink Bloon zooms fast enough past the Spike Factory, it cannot spew out the Road Spikes fast enough to catch that pink bloon, unless it is placed far enough from the entrance.
- Also, the "never misses" is false if placed far enough from the track. This will change it to "always misses".
- In Bloons Monkey City, the range of the Spike Factory is the range it had when placed. This means that when you place a Spike Factory and then a Monkey Village upgraded 1/0, it will only produce spikes inside the original range. If you place the Monkey Village first, the range will be increased.
- In BMC, 3 4/2 Spike Factories can beat any tiles with only one ending.
- In BMC, Spike Factories are very useful and are actually a very good tower to spam in late rounds in Contested Territory. Unfortunately, the limit number of spike factories is only 12, making them not as useful compared to BTD5.
- In BTD Battles, spamming 1/4 spike factories is a viable option in the later rounds (32+), as Super Monkeys are not as useful as in BTD5/BMC.
- After a round in BMC, its spikes will disappear, with the exception of an MvM attack, where they will only disappear if they stay too long on the track or are used up.
- Some players tend to call this tower the "spactory", which is an abbreviated and shortened version of "Spike Factory".


| |||||||||||||||||||||||||||||||||||||||||||||||||||||||||||