m (General fixes, code optimization) |
(Added my own strategy.) |
||
| Line 250: | Line 250: | ||
Strategy by: maskerungu. |
Strategy by: maskerungu. |
||
| + | |||
| + | |||
| + | ==Strategy 23== |
||
| + | Unsure if this works on Flash, as I only use Mobile/Steam/Windows. Requires 1 Monkey Village with Jungle Drums and Monkey Fort researched, 4 Spike Factories with Spiked Ball Factory and MOAB-SHREDR Spikes researched, and 9 Sniper Monkeys with Point Five Oh and Semi-Automatic Rifle researched, as well as level 3 Monkey Knowledge for Sniper Monkeys, Spike Factories, Monkey Villages, and Bloon Sabotage. Shortened terms will be used to describe towers and upgrades from here on in. |
||
| + | |||
| + | Place a 0/0 Village near the end of the track, so that it covers a good bit of placeable area. Place two spactories at the very end of the track, and upgrade them to 3/2. Place another two spactories at the other end of the Village's radius, closer to the entrance. Upgrade them to 1/3 (White-Hot Spikes is unnecessary, as there are no Lead Bloons or DDTs in this mission). Upgrade the Village to 2/1, and start the round. During the rounds, place down as many Snipers as you can, set their targeting to Strong, and upgrade them to 1/1. When you run out of Snipers, start upgrading them to 2/1, and then 2/3 if possible. This should take out all Bloons easily with no lives lost. |
||
| + | |||
| + | Strategy by Thermoxin, with some credit to strategy 3 for the MOAB-SHREDR Spikes tip. |
||
[[Category:Strategies]] |
[[Category:Strategies]] |
||
Revision as of 17:09, 6 May 2020
This page contains strategies for MOAB Graveyard.
Strategy 1
Up to eight cannon towers (seven with tier 2/3 and the furthest one on the track with tier 4/2) near the middle of the track ensures you can defeat all the moabs prior to ZOMG. Then on the last two curves place 3 or 4 tack shooter towers tier 4/1. Afterwards place two spike factories prior to the cannons tier 1/3 to shred the ZOMG before it reaches the cannons. The tack shooters clean up the non moab class bloons after they pass the cannons better than any other tower. Use a monkey village tower to upgrade your cannons at the start of the match, after which it can be sold.
Strategy 2
(Derived from http://ninjakiwi.com/forums/204/posts/40652) Put an Ice Monkey 3/2 ("Arctic Wind") in the first small bend, a Monkey Village 2/3 ("Monkey Intelligence Bureau") within its range, and spam Bomb Towers 1/3 ("MOAB Mauler") in the big bends, with as many as is feasible within range of the Monkey Village. Increase MOAB-class neutralization in the big bends as you gain funds. Successfully done with only 6 Bomb Towers, 1 Monkey Village, 1 Ice Monkey, and 1 Spike Factory. The key realization here is that a well-placed Ice Monkey 3/2 boosted by Monkey Village 2/3 beats a very large number (any number?) of non-MOAB-class bloons. A single ZOMG's spawn is not enough to beat it.
Low-tech variation (city level 18): place a 0-0 Monkey Village outside the first bend, a 2-0 Village inside the second bend, to cover both the inside of the second bend and the inside of the third bend. All within the village ranges, add a 3-2 Ice Monkey and a 2-3 Boomerang Thrower in the third bend, a bunch of Bomb Shooters in the third bend (3-2 for the left-most, 1-3 for the right-most). Add a 1-2 Spike Factory outside the first bend. Then upgrade all the right-most Bomb Shooters to 1-3. That should get you through the first wave. Between waves, add a second 1-2 Spike Factory near the first, then sell the Village. Upgrading all the Bomb Shooters (1-3, or 3-2 for the left-most) should get you through the second wave. The third wave will be a close call, but adding a Dartling Gun near the Ice Monkey (within Village range) should help pop the zebra bloons so the Ice Monkey can clean up.
Strategy 3
There should be two 1/3 spike factories near the middle of the track with a combination of a 3/2 ice tower, 3/1 boomerang throwers, and a 3/2 cannon in the back. After that, spam moab maulers (2/3) on the opposite side of the spike factories. https://www.youtube.com/watch?v=b90vGaybLqI
Strategy 4
1. Put down a 2/3 Village in the second-to-last small bend.
2. Put a 3/2 Ice Tower in the last bend.
3. Pile 0/3 Bomb Towers in the middle bend, placing as many as possible in the range of the M.I.B. during rounds 1 and 2. Start upgrading on path 1 during round 2 as well, so there are 7 MOAB Mauler in total (5 1/3, 2 2/3). Then save up.
4. Once the BFB round is over, place a 2/2 Spactory (Spike Factory) and another 1/2 Spactory in the range of the Village.
5. Get both factories 3/2 ASAP.
6. Win!
Strategy 5
Simply place one unupgraded village at the end of the track. Within it's range place two or three 4/2 spike factories. Add some 1/3 spike factories slightly further from the exit (but still very near the end). Upgrade these to Spike Storm if possible later on. Due to the slow speed of MOAB class bloons, it gives the S.Factories enough time to build up stacks big enough to destroy the MOAB class bloons.
There is no need to upgrade MOAB SHREDR spike factories to White Hot Spikes as no leads are present in the level.
Strategy 6
First wave, build the village (2/0) and the cannons. Build another village on top of second to last bend, use it to build a 3/2 ice tower for cheap, then sell it and build the boomer 2/3. This is enough for wave 1 & 2.
At the end or during wave 1 and 2, build the two 3/2 factories.
Now when the ZOMG arrives and gets killed, slow down the game and build more boomers 3/2 close to the ice tower to help kill the bloons. You'll have plenty of cash left for the second ZOMG, so add whatever you want with that.
Strategy 7: None shall pass.

1. Build a 2/1 Monkey village.
2. Build 7 spike factories and start upgrading them, the first two should be 1/3 and the last 5 should be 3/2.
3. After the first ZOMG goes down, you'll have a lot of money left to spend it to whatever you want. Suggestions include a sniper & two bomb shooters.
This tactic has been used and repeated without any bloons passing.
variation:
1. build a 2/1 monkey village
2. build 3 spike factories upgraded 1/3
3. get a bloon chipper and upgrade it 1/2
4. (should be about round 2) get 2 ninjas upgraded 2/3
5. get a wizard upgraded 2/3
6. get a spike factory at the end upgraded 1/2
7. get another 2/3 ninja
8. (round 3-ish for rounds 7 and 8) get a 2/3 bomb tower on first curve so it can see the whole curve.
no bloons passed
Strategy 8: End is Dead
1. Build a 2/1 Monkey Village at the end.
2. Build 5 spike factory's and start upgrading them, the 2 at the end of the track should be 3/2 while the other 3 should be 1/3. (As a matter of fact, the middle tower can be both 1/3 or 3/2. Should work either way.)
3. During the BFB round, add another 2/1 Monkey Village between the first and second bend, then put Moab Maulers (2/3 bomb towers) around it to increase MOAB popping power. 4 should do the trick, but build as many as you can afford.
4. During the ZOMG round, the ZOMG should be pretty dead by the Moab Maulers. When they are about dead, they will hit the Spike Factory rush then explodes into BFBs, Moabs, Bloons.
NOTE: This works with the Android version. I am not too sure about the PC version.
Strategy 9
Start: Build a 4/2 Spike Factory (Even Faster producing Spiked Mines) right at where its range cover a tiny portion of the last small curve of the track. Use a village to decrease the price as well.
Easily pass rounds 1 (10 MOABs) and 2 (6 BFBs).
Before starting round 3 (2 ZOMGs): Build another 4/2 Spike Factory next to the previous one. You could sell the village now if you want or upgrade it 2/1 (your choice-you should be able to pass without upgrading).
During the final round, you could use the rest of your money to spam as many Road Spikes as possible if you don't feel confident with your defenses.
Anyways, you SHOULD be able to pass without spamming road spikes at the last round or by upgrading your village 2/1 or both.
Tested twice in the first city and nothing leaked at all. Both NLL. Does not work on Kindle Fire.
A variation on that strategy
At the start, build a 2/1 Monkey village and then (If you build the Spike Factory first, the range increase from upgrading your Monkey Village will screw stuff up.) place a Spike Factory at the far left of the screen, as far as possible without its range becoming red, so that its range just overlaps with the very tip of the final curve. Upgrade it to 4/2 and then build a Sniper Monkey next to your Monkey Village (preferably below it, so it doesn't get in the way of the Bomb Towers later), and upgrade it to 1/0, then 1/1, then 4/1. (If you don't have enough money right away, don't fret, as the Spike Factory and Monkey Village alone will get you through without losing any lives until round three.) While rounds 1 and 2 are going on, you can be AFK for 30 to 60 seconds since you don't start to do anything.
By round three, you should have enough money to upgrade your Sniper Monkey to 4/1. Do that, and then place three Bomb Towers above and to the right of the Monkey Village so that they're in its range. Upgrade them to 1/3 (Give them the range upgrade so they can shoot at the ZOMG as its going around the previous bend.) and set their targeting to Strong.
When round three starts, your Sniper should still be set to First. Keep it targeted to First until the first ZOMG and all of its child BFBs are destroyed (all that remains of the first ZOMG is MOABs and non-MOAB-class bloons), after which it should be set to Strong until everything, down to and including the last red bloon, from the first ZOMG has been popped, in which case you should set it to First again and leave it that way for the remainder of the track. Then use the money from the first ZOMG to buy something for purely psychological purposes, to make you less worried of a bloon leakage. I personally used it on a 2/2 Ice Monkey and a 3/2 Ninja Monkey. However, you can use it on more 1/3 Bomb Towers or anything else you want. If you've placed your towers well, you shouldn't even need to buy anything else at all, as long as you don't sell your 4/2 Spike Factory, your 2/1 Monkey Village, your 4/1 Sniper Monkey, or any of your at least three 1/3 Bomb Towers, in order to win without losing any lives.
Strategy 10
Place in the front two spike factories with MOAB SHREDR spikes with a village in range. Place an ice monkey with Arctic Wind at the back with two boomerang monkeys with Bionic Boomer. Place as many bomb towers with MOAB mauler in range of the village to make your upgrades cheaper. Attempt to place a spike factory with spiked balls near the end (for the ceramics). So, the spikes at the front should immediately shred the MOABs, the bomb towers help destroy BFBs and the ZOMGs; the last spike factory, the ice monkey and the boomerang monkey finish the clusters of non-MOAB class bloons.
Strategy 11: Micromanagement
You need a few upgrades unlocked.
Sun God (3rd rank super monkey), MOAB Assassin (4th rank cannon)
Start by placing a monkey village in the middle of the track, and drop your super monkey inside its range, as far towards the back as possible. Upgrade it to 3/0 (Sun god) using your starting cash. Spend the remainder on a 0/3 cannon as close to the start of the track as possible, but still inside the village range. You'll have somewhere around 2k cash left over. keep it.
Within the first few rounds, upgrade the cannon to 0/4. Then feel free to use the MOAB assassin ability. You'll start actually needing it when clusters of 3 blue moabs come, shoot down one ASAP. The sun god can handle an infinite number of non moab bloons and it will single handedly pop all the ceramics that come out.
As soon as you can, add two additional 0/4 cannon towers, next to the sun god near the back of the track, and set them to target Strong. You only need three in total. Judicious use of MOAB Assassin will handle everything up until the ZOMGs with no problems.
Once the ZOMG bloons come out, use all three assassin abilities immediately to pop it. Then SELL your front cannon tower, and buy another 0/4 in the same spot, immediately use its MOAB assassin to kill one of the three BFBs, then sell and rebuy it.
Do not immediately use the ability again. Wait for the smaller MOABs to move farther up the track, and be slain by the combination of sun god plus the other two cannons. MOAB assassin targets the nearest large bloon so you must wait until a BFB is nearer to your front cannon than the smaller MOABs. When one is, fire again. Then sell and rebuy it.
Repeat this process for all subsequent ZOMGs. In total you will need to sell and rebuy the frontal cannon three times for each ZOMG. Don't worry about anything else but micromanaging that frontal cannon, your other towers will handle everything smaller than BFB.
If you have some cash to spare, put it into sun god range upgrades, and the monkey village range and fire rate upgrades.
Strategy 12: Invincibility
- Put 3 1/3 Spike Factories at the first bend of the track.
- Put 3 4/x Tack Shooters at each of the last three bends.
- Put a 4/x Dart Monkey next to the first Tack Shooter and set it to "Strong".
- Put 2/3 Bomb Shooters set to "Strong" in the middle bend and continue doing this throughout the game.
Strategy 13: Mobile strategy
- Put 10 dart monkeys near the entrance
- Upgrade 3 dart monkeys into super monkey fan clubs
- Use one ability every time a MOAB, BFB, or ZOMG comes out
- after that get either super monkeys or MOAB mauler or snipers
Strategy 14: Mobile strategy
- Place 4 4/x Bloonchippers near the first bend of the track. Set their target priorities to strong.
- Place a 3/2 Ice Tower on the last bend of the track.
- Place at least 2 3/1 Boomerangs near the Arctic Wind so it can pop the children bloons.
- Through out the mission, collect enough money for more Super Wide Funnels and Glaive Ricochets. Make sure the Super Wide Funnels have their target priorities to strong.
Strategy 15: Easy peasy
- 1 x Village 2/1
- 9 x Moab maulers 2/3 (in the range of the village)
- 2 x Spactories 3/2 (in the range of the village)
- At the end of round 2 add as much 2/0 Boomerangs as you can (always in the range of the village).
- Slow down the game and upgrade everything to 2/3 Boomers as soon as you get the cash (in the middle of killing the 1st Zomg)


Notes :
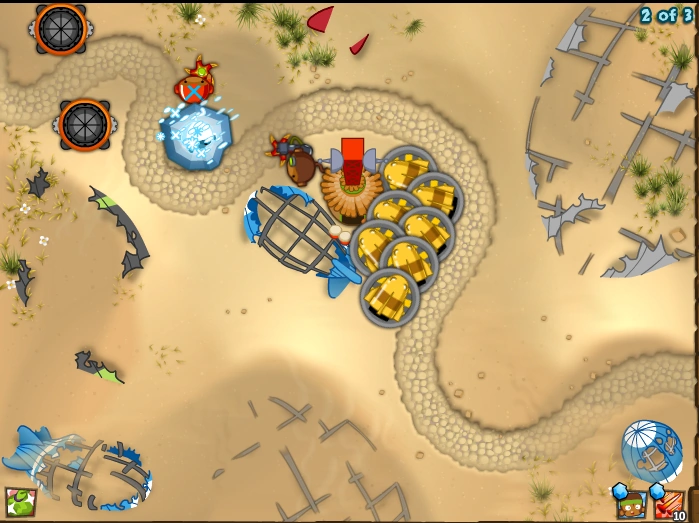
- See picture for towers placement.
- You can use
 1 for the first Zomg to make things even easier (it is free since you get the 5 for not losing any life)
Strategy 16: Easy with a Tint of Dartlings (MOBILE ONLY)
3 Dartlings (2 2)
2 Spike factories (3 2)
- at the end
Snipers (3 2)
- (2 to 3, more if you want)
Ninja Monkeys (3 2)
- add last along the first 2 curves
Some Bloonchippers (2 2)
- To clean up the non-MOAB Class Bloons on Round 3 (The Ceramics)
LOTS OF MONKEY BOOSTS
*** Use the monkey boosts (ESPECIALLY ON THE ZOMGS)
*** Keep on the slowest speed to ensure that the dartlings hit the bloons
Strategy by 0123456789
Strategy 17: Non-Tier 4
This strategy is good for ones who haven't unlocked Tier 4 upgrades yet.
- Place down a Monkey Village in the second curve from the right
- Upgrade the Monkey Village to 2/1
- Place as many Bomb Shooters in the Monkey Village's range as possible, at least 6 is sufficient
- Set the Bomb Shooters to 'Strong' priority
- Place an Ice Monkey in the third curve from the right
- Upgrade the Ice Monkey to 3/0
- Place a Glue Gunner in the Monkey Village's range, but keep it near the Ice Monkey
- Upgrade the Glue Gunner to 2/3
- Try to upgrade as many Bomb Shooters to MOAB Maulers as you can
- Start the round. As you accumalate money from destroying the MOABs, upgrade more Bomb Shooters into MOAB Maulers
- If you have done it correctly, you will be able to steamroll through the BFBs and ZOMGs
- Congrats!
Strategy 18
Requirements: Path 1 - Tier 4 upgrades for Monkey Ace, Heli Pilot and Bloonchipper.
- Place a 4/0 Monkey Ace near the middle of the track, preferrably under the second bend (set it to horizontal 8 flying pattern for best results), and a 3/1 Heli Pilot set to Pursuit mode; these two towers are capable of handling the first two rounds by themselves with ease;
- At the end of the 2nd round you should have enough cash to purchase the Apache Dartship upgrade for your Heli Pilot; once you've done that, start round 3;
- You shouldn't have any problems with the first ZOMG as long as you set the Heli to manual control and make sure it says in front of the blimps, and once it's been taken out you should have ~7100$: buy a Bloonchipper and upgrade it to 4/1;
- The Bloonchipper is just insurance to make sure the second ZOMG's BFBs don't cause any trouble; you won't need any boosts or other upgrades to finish the mission.
- Congrats, you have captured a Desert tile!
(Strategy by dwarftopia) Easy Peasy Strategy Spam 1.3 Spike factories (7 required) but at the ZOMG round buy a 0.2 super monkey to destroy the ZOMGs. Sell the super monkey when the ZOMGs escape the super monkey's range. (Requires Level 24)
Strategy 19. "Super-Spiky-MOAB-Maulers"
It's easy peasy red bloon squeezy to pass if you have 6 spike factories that can be upgraded 1-3, 4 cannons 2-3 and super monkey 1-0. First, place 4 factories 1-3 at the end. At the first turn place (if you have) all your free dart monkeys (not necessary). Then place cannons (near the dart monkeys) upgrading to 0-3, then when you have 4 0-3 cannons, upgrade them to 2-3 (increase range). Then place 2 factories 1-3, and at the end a supermonkey 1-0. If you did this, you can even get a 'NLL' (as me). I was at Level 21.
Strategy 20: Exploding Ice
For this strategy, you will need:
-2 Ice Monkeys (4/2 and 2/3)
-6 Bomb Shooters (2/3)
-1 Spike Factory (1/3)
-1 Ninja Monkey (4/2)
-1 Monkey Apprentice (3/1) (Optional)
-![]() 2 for the ZOMGs (
2 for the ZOMGs (![]() 5/10 on Flasb/Mobile, respectively)
5/10 on Flasb/Mobile, respectively)


This is how the layout should be.
Start of with a 4/2 Ice Monkey in the largest bend, and place 3 MOAB Maulers below the Ice Monkey, and 3 more across. Wait it out until you gave enough money, then place a 2/3 Ice Monkey parallel to the 4/2 Ice Monkey, then wait again and place a 1/3 Spike Factory in the small space between 2 MOAB Maulers. Place a 4/2 Ninja in the second-to-last bend along with a 3/1 Monkey Apprentice. Enjoy your win! (Message: You might lose some lives, works on BMCM, might work on Flash. Made by Unknownimous)
Strategy 21: Super Jaws of ice (Works In flash, Maybe Mobile)
Very easy, I did 2 MOAB Graveyard 2 times NNL(Flash Version). You will need: 1 2/3 Ice, 1 2/3 Glue, 1 2/2 Super, 2/1 Village, 10 2/3 Bomb. Start by Placing a 2/3 Ice at the second to last bend. Then place a Glue next to it, this is for cleanup, its the Ceramics that kill. Then place a 2/1 village on the TOP SIDE of the path next to the ice trap. Then place a 2/2 Super next to the village, then place as many 2/3 bomb as you can within the village radius (Radar scanner may help). Continue to place 2/3 bombs around the 2/1 village, and GG if you made it! (Note: I was level 25 when I did this.) Made by Thundergod121


.png)
This is the layout. First ZOMG.
Strategy 22: Bloonchipper's Great Mouth(Mobile only)
Teen of city level needed and a Blooncipper's Blueprint captured, also Super Wide Funnel researched.
You have given a 30.000$, right?(+50$ with Magic Purse). Place village 1|0 (keep the village range does not touch the track) then 3|2 Glue at furthest of village range from entrance, then place 3|2 Ice beside 3|2 Glue (keep under Village range). And now, place 2 4|0 Bloonchippers(look for it's range doesn't touch the bloon's track--that disturbs glue's poison) a Strong priority(all Bloonchipper's that you have).


Blooncippers eat BFBs
Start the first Round. MOAB will be takedown by Bloonchipper and release ceramic pack that will be popped by Glue and Ice. Place another Bloonchipper but remember set to Strong and keep all Bloonchipper range only touch the outside part of the track to unsucks ceramic bloons. Upgrade Blooncipper to 4|0 Bloonchipper or 4|2 Bloonchipper without touching the right-side tracks, ect.
Bloonchippers are sufficient until 2 ZOMG's(min. 6 Bloonchipper's).
Keep in mind : Bloonchippers fight MOABs , Glue and Ice fights Ceramics.
Strategy by: maskerungu.
Strategy 23
Unsure if this works on Flash, as I only use Mobile/Steam/Windows. Requires 1 Monkey Village with Jungle Drums and Monkey Fort researched, 4 Spike Factories with Spiked Ball Factory and MOAB-SHREDR Spikes researched, and 9 Sniper Monkeys with Point Five Oh and Semi-Automatic Rifle researched, as well as level 3 Monkey Knowledge for Sniper Monkeys, Spike Factories, Monkey Villages, and Bloon Sabotage. Shortened terms will be used to describe towers and upgrades from here on in.
Place a 0/0 Village near the end of the track, so that it covers a good bit of placeable area. Place two spactories at the very end of the track, and upgrade them to 3/2. Place another two spactories at the other end of the Village's radius, closer to the entrance. Upgrade them to 1/3 (White-Hot Spikes is unnecessary, as there are no Lead Bloons or DDTs in this mission). Upgrade the Village to 2/1, and start the round. During the rounds, place down as many Snipers as you can, set their targeting to Strong, and upgrade them to 1/1. When you run out of Snipers, start upgrading them to 2/1, and then 2/3 if possible. This should take out all Bloons easily with no lives lost.
Strategy by Thermoxin, with some credit to strategy 3 for the MOAB-SHREDR Spikes tip.