This page contains strategies and tips for Consecrated Ground.
Overview[]
Towers are generally placed around the intersection of the track for the most effectiveness. 3/x Apprentices are placed along the sides of the track to hit the most bloons.
Tier 3 Super Monkeys are usually used as the main DPS - the right path (Robo Monkey) is superior in this track as it is cheaper and better at destroying MOABs.
To manage the camo bloons that spawn in Round 1, 2x 3/2 Apprentices and 3x 0/3 Apprentices is sufficient to handle any of the possible R1 camo waves. It is recommended to keep x/3 Apprentices at 0/3, as the left two upgrades do not provide a significant damage boost. After Round 1, x/3 Apprentices can be sold to invest in Super Monkeys - camo popping power is not needed after R1, and its damage output is inferior to a T3 Super Monkey.
2/0 is usually prioritized over 0/2, but 0/3 is better than 2/2.
It is possible to complete this track without T4s or T3 Super Monkeys, but it is extremely difficult and will likely require Monkey Boosts and/or continuations.
Strategies[]

The final layout for Ardrinsarelwqu's strategy - it is able to complete the challenge with relative ease
Ardrinsarelwqu's Strategy - Low Effort (Mobile/Steam)
Requires: 2/3 Super Monkey x2, 3/3 Apprentice (x2+, depending on camo luck), no Monkey Knowledge
- Place a 1/3 Super Monkey near the center in the bottom-right quadrant of the temple
- Place a 3/2 Apprentice on one side of the Super Monkey, and a 0/3 Apprentice on the other side
- Upgrade the Super Monkey to 2/3
- Place another Super Monkey near the center in any one of the other 3 quadrants
- Upgrade the new Super Monkey to 2/0, then 2/3
- Win
Notes: If there are too many camo bloons, add another 3/2 Apprentice, and start with a 0/3 Super Monkey. If there are too many ceramics or MOABs, start with 2 3/2 Apprentices instead of a 3/2 and 0/3 Apprentice. Make other changes as necessary. This strategy is refined for low-effort farming, not NLL, but it should produce good results most of the time.
User Guy 15's Strategy (Mobile)
Requires: 3-2 Supermonkey (2) 0-3 apprentice (2)
- Get a 3-1 supermonkey in the bottom right part of the track, touching it.
- upgrade it to 3-2 as soon as possible.
- Buy a 0-3 apprentice in the bottom left part.
- If there are camos, buy a 0-3 apprentice in the bottom left and rush a 3-2 sun god.
- Then, buy another 0-3 apprentice in the top right section.
- Get a 2-0 super in the top left part. Then buy 2-1.
- Upgrade the super to 3-2.
Why apprentice before 2nd super?
- is more cost efficient, and combined with 3-2 super can beat Moabs.
a 2-1 super, 3-2 super, and 2 0-3 apprentices can beat a round 6 BFB.
Not Always NLL
ClovenSeeker812's Strategy (Mobile)[]
Requires: 3/2 Supermonkey (2) and 2-3 apprentice (2).
- Get a Sun God (3-0 Supermonkey) in the lower right corner of the intersection, then get a 2-2 Apprentice at the top right corner of the intersection.
- Upgrade the Apprentice to 2-3, then upgrade the Sun God to 3-2.
- Get another Sun God in the top left corner of the intersection.
- Finally get a 2-3 Apprentice at the bottom right corner of the intersection.
Note: This can be modified for different bloon waves.
Hugo's Strategy[]
Need: Supermonkey (kill MOABs) and 3 apprentices; one phoenix kills the DDTs.
- place a Sun God in the lower right part, near the intersection, at the start (3/0, make it 3/2 before MOABs in round 2)
- get an apprentice in the upper left part (2/2, make it 2/4 before the DDT around round 4).
- get two more apprentices in the lower left and upper right part (3/2, later 4/2)
Getting one of the 3/2 apprentices in round one could save some lifes with camo bloons.
0123456789's Strategy[]
Need: 3/2 Supermonkey (x2) and 3/3 apprentice (x6) (can be done with 3/2)
- place a Sun God in the lower right part of the intersection at the start.
- wait and get an apprentice in the upper left part 2/3 (might work with 3/2).
- then get 3/2 apprentices in the other 2 corners, and three behind the Sun God (3/2).
- then hope you don't get sent a DDT (just spend
 20 if you do, or restart)
- you will have lots of cash at the end, so this is when you can get the second super monkey
- about round 8 or 9
- you will have lots of cash at the end, so this is when you can get the second super monkey
- ENJOY THE NLL WIN!!! :)
Tetraphosphate's Strategy (for Mobile)[]
I noticed that most of the strategies on this page are for the Flash version, and Mobile seems to have different bloons coming out than Flash (it contains many more MOABs, with some even coming out on round 2). So, here's a strategy that works for Mobile, and if you're careful you could probably do this NLL (though I lost 20 lives).
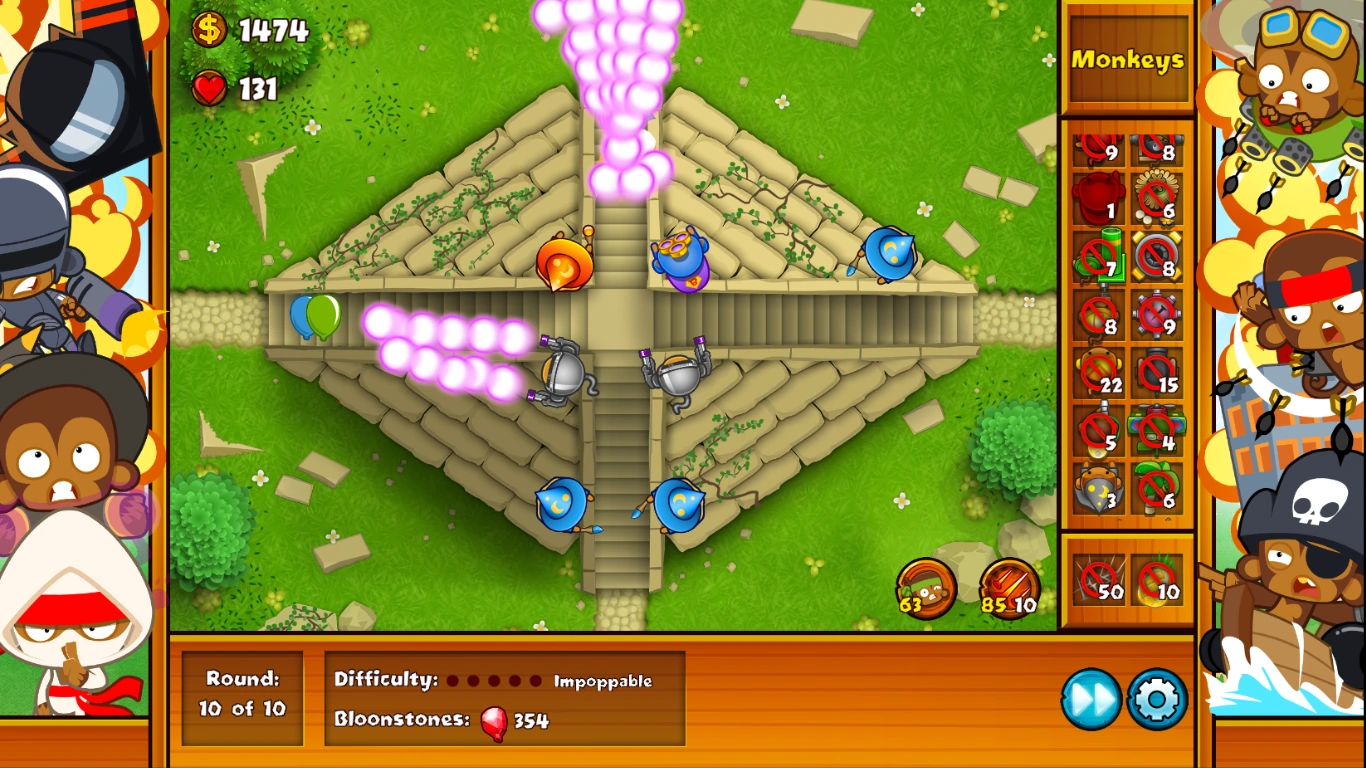

My setup on the final round
- Need: 2/3 Super Monkeys, 2/3 and 3/2 Apprentices.
- Place a 2/3 Super Monkey on the bottom right corner, and a 2/3 Apprentice on the top left. These should be able to take care of the MOABs.
- After starting the game, add some 3/2 Apprentices near the end of the paths.
- Place a 2/0 Super Monkey at the bottom left corner, and upgrade to 2/3.
- Do the same in the top right corner (in the picture I hadn't upgraded it to 2/3 yet)
- In my game, MOABs started coming out on round 2, and BFBs on round 8 or 9. I didn't recall seeing any camo bloons though (perhaps there are none on Mobile).
GeometryDasher43's Strategy[]
Works without 3/3 Super Monkeys!- Modeled after Ninja-Aaron's strategy
You need:
5 monkey apprentices, 3/3
3 super monkeys, 2/2
1- Place 2 0/3 apprentices, one right next to the intersection on the top left and one on the bottom right.
2- Place 3 3/0 apprentices, one right next to the intersection on the top right, bottom left, and bottom right (as close as possible but still diagonal to the 0/3 apprentice).
3- Place a super monkey as close as possible but still diagonal to the 0/3 apprentice on the top left, and as the rounds go on, upgrade to 2/0 then 2/1.
4- Use a monkey boost when the grouped MOABs come on round 4, I think you need it.
5- Place 2 super monkeys closely diagonal to the 3/0 apprentices on the top right and bottom left; Upgrade them the same way as the first one.
6- Upgrade super monkeys to epic range ASAP, and then just sit there until you win!
Ninja-Aaron's strategy[]
You will lose lives but it is most convenient
Requirements:
5 monkey apprentices, with tier 3 unlocked on both sides (Summon whirlwind, and Dragon's Breath)
3 super monkeys, with tier 2 unlocked on both sides (EPIC range, and plasma)
- At the beginning, place 2 (2 | 3) monkey apprentices, one in the top left touching track on 2 sides, and one on the bottom left also right by where the track intersects
- On the right side, place 3 (3 | 2) monkey apprentices, one on the top right where the track intersects, and two on the bottom right.
- Place a super monkey on the top left diagonal from the top left monkey apprentice, and as close as possible.
- As the rounds go on, upgrade it first to (2 | 0), than to (2 | 2)
- Place another super monkey next to it, and repeat step four with this new super monkey
- Place a third super monkey next to the first, and upgrade this one as well to (2 | 2)
- Rinse and repeat!
AnonymousTD's Strategy[]
Consider a 2/2 Super monkey in the bottom right, with some Wizards (3/2 or 2/3). Try to make the SM 3/2 for bloons and BFBs. If a BFB comes, try the Monkey Boost.
210577bloons's Strategy[]
- Start off with a Sun God in the top right and a 0/2 Wizard on the top left.
- Upgrade Wizard 2/3.
- Upgrade Sun God 3/2.
- Get another Super Monkey in the bottom left and upgrade it 2/0, then 2/2. you need the plasma ASAP
- Get a few more Apprentices in the bottom right as necessary.
Septimus15 Strategy[]
I did not use Super Monkeys at all
- Start off with 1 2/4 monkey apprentice at the top right of the pyramid
- Set 3 2/3 monkey apprentices in the other corners
- Set another 2 monkey apprentices except make them 4/2 at the exit
- Finish by surrounding the rest with 2/3 monkey apprentice
Redsnake25's Strategy[]
I only used 1 Wizard and 3 Super Monkeys. Starting in the top left corner of the intersection and going clockwise, I used a 2|2 Super Monkey, 3|2 Super Monkey, another 2|2 Super Monkey, and a 2|3 Wizard. Anti-camo Dust is needed. May not work with DDTs.
- Start with the 3|2 Super Monkey, upgrading to a 3|0 and a Wizard to 2|2.
- Upgrade Wizard to 3|2 ASAP.
- Fully Upgrade one of the 2|2 Super Monkeys, and use the Anti-camo dust when the camo-rainbows come.
- Fully Upgrade the final 2|2 Super Monkey, and use Anti-camo dust again as necessary.
This strategy worked the first attempt with no lives lost(an completion bonus of ![]() 25).
25).
TD-Follower's Strategy[]
A whirlwind for each track just after the intersection, not overlapping both at once, for early camgrow or Dragon Breath or both if necessary. Tempest Tornado later is optional, as is Phoenix.
Apart from that, which is variable depending on bloon composition throughout rounds, just spam Robo-Plasma, one or two at top left, depending on BFB count, and remainder on lower right, and DO overlap tracks with these for best coverage.
easy555's strategy[]
start with a 2,3 super monkey in the top left corner of the intersection and three 2,2 monkey apprentices in the bottom left corner.
when possible, upgrade one of the apprentices to 2,3 and the other's to 3,2
then place another super monkey in the top left and upgrade it to 2,2 then 2,3
repeat the previous step.
Another strategy[]
Use a 2/3 robo monkey at first, buy a 2/2 apprentice, use the anti camo dust when neccesary. Buy another 2/3 super. If DDTs come, sell one 2/3 and upgrade the another to 2/4, use the anti camo dust immediately, then use the tech terror's ability. Simply done, no monkey boosts, red spikes, continues.
Qwertyxp2000 the second's strategy[]
Start with a 2/3 Robo Monkey on the bottom-left intersection. Put 2/2 Wizards on the right side of the intersection. Anti-Camo Dust any camos that are Camo Zebras or above (in my case, Camo Rainbows). Get another Super Monkey on the top-left intersection and get range upgrades then towards Plasma Blasts. Keep Anti-Camo Dusting any camos that are Camo Zebras or above. Once you have at least 4 2/2 Wizards, do not Anti-Camo Dust camos that are lower than Camo Zebras. Get the two Robo Monkeys as soon as possible, particularly when BFBs come. Also get some Whirlwind Wizards too in case of MOAB children sneaking through.
I had approximately Rank 5 for my Wizards and Super Monkeys.
")
")
")
")
")
")
")
")
")
")
")
")
Hubianzhen's strategy (Mobile)[]
To be honest, this track is difficult. With some help and patience, I managed to complete it without a single scratch.
Note that this track generates a random seed for bloon spawns, so be sure to know what yours have.
Moving on, Round 1. Following a minor round ramp, several camo bloons may or may not come your way. If you're like me, obviously you'll need x/2+ Monkey Apprentices, but feel free to add a Super Monkey (you may want to upgrade it to 2/2) path the intersection for more firepower against non-camos. Some Summon Whirlwinds a tad behind the intersection and Dragon's Breaths at the intersection can possibly clear them out without letting them get through, but the tiny differences in placement kinda depends. Fortunately, you won't see these nasty camos again after this round.
Round 2. Be wary of the first MOAB. Since your budget's a bit tight, sell your wizard(s) so you can get Super Monkey to 2/3. That one tower should be sufficient to make short work of one or two blimps. Get one more Super Monkey to 2/3 in case a BFB spawns on Round 5. Finally, continue building your defense until Round 10. Let's hope we don't encounter ZOMGs or DDTs while we make it to the end.
If you do see a ZOMG, put all your best firepower on Super Monkeys. If you see a DDT, take note of the round it appears on, retry, and once you return to there, burn it alive with multiple Summon Phoenixes.
Tips[]
- Don't worry too much about DDTs. If there are DDTs, try again and use some x/3 or x/4 wizards and the monkey boost.
- Usually your Consecrated Ground will have one of two characteristics: either lots of camo or BFBs. For camo, use 4 3/2 wizards, and for BFBs, a 3rd tier Super Monkey (either one should work).
- You should probably get a tier 3 Super Monkey before you tackle this tile.